Implementing Routing in React
- Routing in a React application allows you to navigate between different components or pages without refreshing the entire page.
- To implement routing, we use the
react-router-domlibrary, which is maintained by the Remix team and provides powerful features for client-side routing.
- Installing
react-roter-dom
npm install react-router-dom
- Setting Up Routing with
createBrowserRouter
- To create a routing, we have to create a configuration for our router.
- We use
createBrowserRouterfor more explicit and flexible route management. - First import
createBrowserRoutercomponent fromreact-router-dom
Here’s how you can set it up:
import { createBrowserRouter, RouterProvider } from "react-router-dom";

const router = createBrowserRouter([
  {
    path: "/",
    element: <Home />,
  },
  {
    path: "/about",
    element: <About />,
  },
  {
    path: "/contact",
    element: <Contact />,
  },
]);

function App() {
  return (
    <RouterProvider router={router} />
  );
}

ReactDOM.render(<App />, document.getElementById('root'));
Understanding the Code
createBrowserRouter:This function creates a router instance with a route configuration. Each route is defined with apathand anelementto render.createBrowserRouter:is a component which take an array of objects which contains routes info.RouterProvider:This component is used to supply the router configuration (router) to your application, enabling routing functionality.
- Navigating Between Routes
- You can navigate between routes using the
Linkcomponent fromreact-router-dom: - The reason we use
Linkcomponent because it don't refresh the page when we click. - The
Linkcomponent ofreact-router-domisanchor tagof html behind the scene. - But it has some configuration that let us navigate which page reload which is essential for
SPA(Single Page Application).
import React from 'react';
import { Link } from 'react-router-dom';

function Navbar() {
  return (
    <nav>
      <ul>
        <li><Link to="/">Home</Link></li>
        <li><Link to="/about">About</Link></li>
        <li><Link to="/contact">Contact</Link></li>
      </ul>
    </nav>
  );
}

export default Navbar;
Nested Routes, Outlets, and Dynamic Routing in React
- Nested Routes
- Nested routes allow you to define routes within other routes, creating a hierarchical structure.
- This is useful when you have components that should render as part of a parent component but on different routes.
- We pass those routes inside
childrenarray.
Example:
const App = () => {
  return (
    <div className="w-full min-h-screen bg-slate-100 dark:bg-black ">
      <NavBar />
      <Outlet />
      <DarkModeToggle />
      <Footer />
    </div>
  );
};

const appRouter = createBrowserRouter([
  {
    path: "/",
    element: <App />,
    errorElement: <Error />,
    children: [
      {
        path: "/",
        element: <Body />,
      },
      {
        path: "/search",
        element: <Search />,
      },
      {
        path: "/restaurant/:id",
        element: <RestaurantMenu />,
      },
    ],
  },
]);

const root = ReactDOM.createRoot(document.querySelector("#root"));
root.render(<RouterProvider router={appRouter} />);
- Outlets
Outletsare placeholders within a parent component where the nested route components will be rendered.- To use
Outletswe have to import it in our root component. - Suppose we want to go on different route but want to change only the body content while keeping the
navBarandfooter. - Thats where we use
Outlets. It just replaces the content with thechildren route. - For example below I have placed
<Outlet />in between<NavBar />and<Footer />. - Now if we go on any router our
<NavBar />and<Footer />will not change only the in between will be changed.
const App = () => {
  return (
    <div className="w-full min-h-screen bg-slate-100 dark:bg-black ">
      <NavBar />
      <Outlet />
      <Footer />
    </div>
  );
};
Error Routes
- As we already know if we go to any other route other than specified one we will get a error, not on console but on our page.
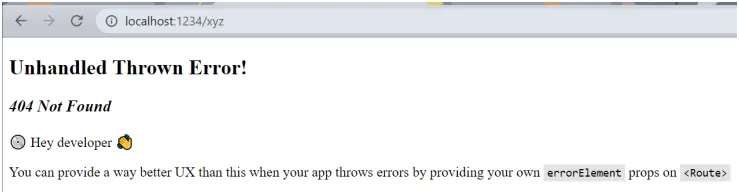
- The above skeleton is provided by the
react-router-domlibrary. - But to provide a good user experience we will certainly need to customize the error page.
- We can do this by creating a
Error.jsxcompoent and pass it inside theapproutertoerrorElement.
const appRouter = createBrowserRouter([
  {
    path: "/",
    element: <App />,
    errorElement: <Error />,
  },
]);
- Whatever we have designed inside the
Errorcomponent it will show now on any routing error. - But that will just be generic message whatever we will write.
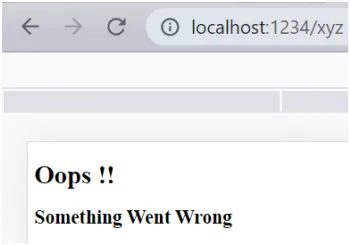
- As in the above image it just a generic message which will not be useful for users.
- So
react-router-domprovides us with a useful hookuseRouteError. - This hook give us info regarding the error.
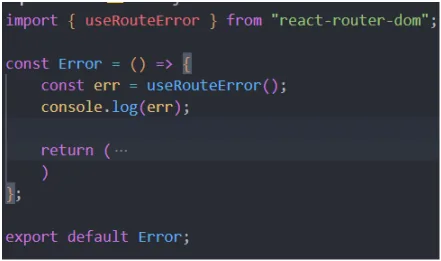
- We can
console.logto see the returned error.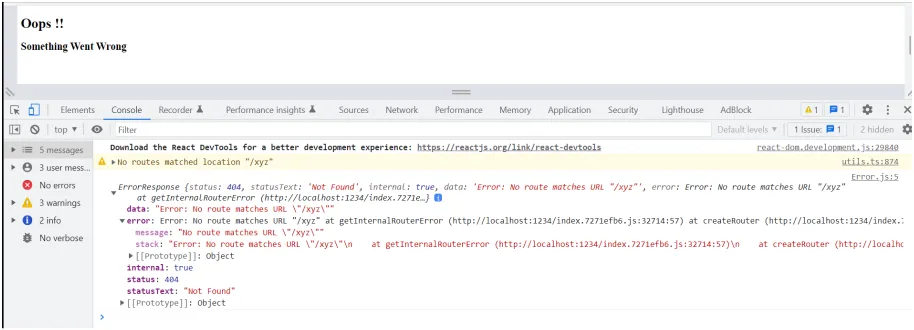
- Then we can use the error info and embeed in our text to show useful info about the error.
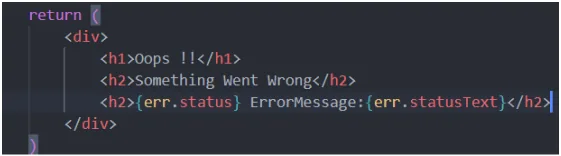
- With this user will know what the reason behind the error.
- We should always try to provide useful info of the error.
Types of Routing
Client-Side Routing
Client-side routing helps us to naviage between different components without reloading the entire page. This is commonly used in single-page applications (SPAs).
- In client-side routing is handled within the browser so the page will not reload.
- The content changes dynamically based on current URL, but the browser doesn't refresh.
- We use React Router
react-router-domto do client-side rounting.
Server-Side Routing
- In server-side routing the routing is handled by server and whenever we click on any routes (components) the request is sent to server which then sends back the HTML for the new page.
- The browser then reloades to display the new content.
- This is typical for multi-page applications (MPAs) or when SEO is a significant concern, as search engines can easily crawl server-rendered pages.
Dynamic Routing
- Dynamic routing allows routes to be generated or accessed based on dynamic data, such as user IDs or other parameters.
- It is useful for situation where we need to render components based on varying data.
- We need to add dynamic segment in the URL (e.g.,
/user/:userId) - Example:
const router = createBrowserRouter([
   {
        path: "/restaurant/:id",
        element: <RestaurantMenu />,
   },
])
useParams Hooks
- The
useParamshook in React is used withreact-router-domto access the URL parameters of the current route. - This is particularly useful when you want to extract dynamic values from the URL to display or process data related to those values in your components.
- When a route path includes dynamic segments, such as
/user/:userId,useParamsallows you to access theuserIdparameter directly within your component.
import { useParams } from 'react-router-dom';

function UserProfile() {
  const { userId } = useParams();

  return (
    <div>
      <h1>User Profile</h1>
      <p>Displaying data for user ID: {userId}</p>
    </div>
  );
}
- We added links to all the restaurant and attached it with id.
- Now every restaurant is clickable with additional info.